
Pizza Dough! (Brock’s for the Kamado and an Easy Oven Version)
Description
For our oven version, if I’m in charge of the dough, I use Jim Lahey’s recipe of No-Knead Bread fame, which I re-found in ‘Dinner: A Love Story’, by Jenny Rosenstrach. I use a simple sauce of sauteed fresh garlic, salt and passata, and so far our favorite pizza is ham, pineapple and bacon (well, probably anything with bacon), but oh! the possibilities! More importantly, Brock has now perfected ‘wood-fired’ pizza using his Kamado smoker…I do not get involved in this, but frequent testing calls for frequent updates and what’s currently (April, 2023) below always leads to a fabulous afternoon of family pizza making!
Ingredients
Oven Version
3 3/4 c. (469 g) flour (you can substitute whole wheat for half if you wish)
2 1/2 t. traditional active dry yeast
3/4 t. EACH salt AND sugar
~1 1/3 c. warm water – start with 1 cup and drizzle more as needed
olive oil as needed
Instructions
For the Oven Version – in a medium bowl, whisk together the flour, yeast, salt and sugar, and lightly oil a second medium bowl. Add the water to the flour mixture and mix using a wooden spoon – and then your hands if necessary – until it’s well blended, at least 30 seconds. The dough will be stiff, and only slightly tacky, not wet and sticky. Scrape the dough out with the wooden spoon and shape it into a rough ball, and then transfer it to the greased bowl, and cover it with plastic wrap. I have a proofing setting on my oven so the bowl goes in the oven, though a spot at room temperature is supposed to work. Allow the dough to rise until it doubles in size, about 2 hours. **I’ve also done all of the mixing in my electric mixer (with the paddle, not the dough hook) and it works out great!
Divide the dough into 2, even-sized balls – each ball is good for an 11 x 17 baking sheet of pizza. At this point, you can flatten and grease each ball and drop it into a freezer bag for later use, just make sure that you take it out of the freezer 2-3 hours before you need it. I use non-stick baking sheets and found that very lightly oiling only the middle of the sheet works best. Drop the dough disk onto the pan and be patient as you use your fingers to work it over the whole area of the baking sheet – this will take some time, but it’s worth it for the thin, crispy crust. Add your sauce and toppings (but not yet the cheese!) and bake at 400 for about 20 minutes. When the crust is nicely browned and you can tap the edges (maybe even use a silicone flipper to gently lift it up and check for doneness and non-stickiness on the bottom), then you can add your cheese and bake for another few minutes, just until the cheese is melted. Perfect, EASY pizza! Our favorite toppings are very crispy bacon and pineapple, and artichoke/olive/pineapple with fresh basil added when the mozzarella goes on.
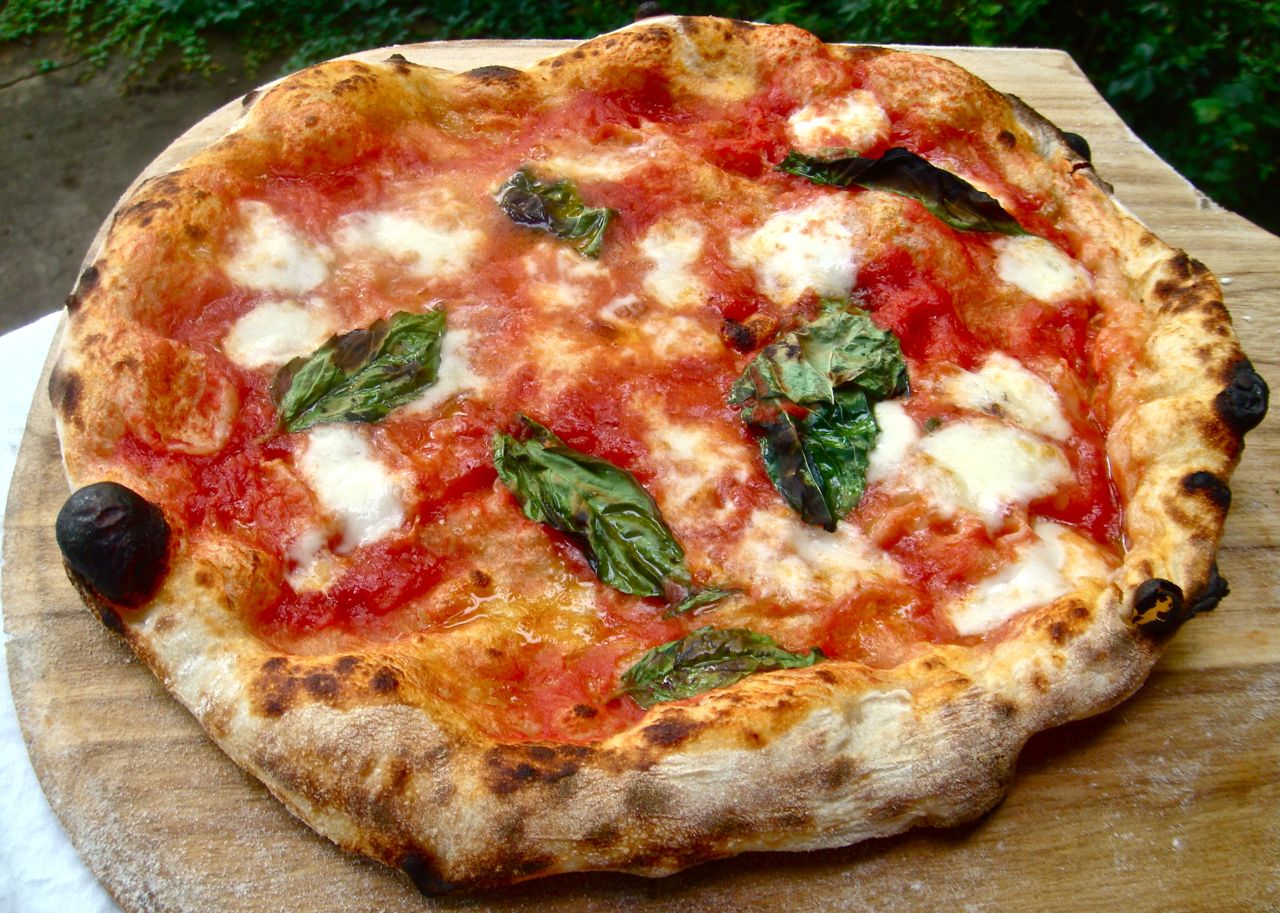
Neapolitan Margarita Pizza – put together by Brock (with inspiration from Tim and Mastering Pizza by Marc Vetri)
Neapolitan style pizzas (Pizza Napoletana) are traditional Italian pizzas that originated in Naples. The pizzas are characteristically thin with light and airy raised crusts (in Italian ‘cornicione’). The ingredients for these pizzas are very simple and so the quality of the pizza is greatly influenced by the quality and ratios of the individual ingredients.
Dough
Dough Ingredients
This is the breakdown of ingredients for 6 smaller (190 g) pizza crusts which are roughly 20 cm in diameter. Note that this ratio of ingredients makes a 60% hydration dough which works for the temperature that we cook at (more on this later) for higher cook temperatures, the hydration should be reduced:
420 mL of water (420 g)– moderately hard and neutral acidity
700 g of 00 ‘strong’ flour – we use the Caputo brand
20 g sea salt
1.2 g active dry yeast (not instant or bread-maker yeast)
This can be adjusted for more or fewer pizzas but note that the larger the batch, the smaller ratio of yeast is required. Also, the length of rising time, how different flours absorb water, and how finely the flour is ground all affect the amount of hydration required to produce the result you want for your pizza crust.
Making the Dough
Add room temperature water to the mixing bowl and dissolve the salt completely. Then add about 10% of the flour and sprinkle the yeast on top (don’t let the yeast contact the salt directly as the salt will damage the yeast cells). Start mixing with the dough hook at the slowest speed setting. Over the next 10 minutes, slowly add the remaining flour. At the end of the 10 minutes mix any remaining dry flour into the dough ball by hand and then continue using the mixer with the dough hook to knead the dough for 15 minutes or so. The dough should be slightly sticky to the touch.
Once the dough is ready, fold the ball in on itself so that a very smooth and tight membrane forms on the outside of the ball, then push the ball around on the counter keeping your fingers straight, this will help seal the dough and contain the gasses that the yeast produces, and it will make the dough more workable later on.
For the first rising, put the dough into a stainless steel or glass bowl that is about 4-times bigger than the dough ball. Add a couple of teaspoons of extra virgin olive oil and roll the ball around in the bowl to coat it completely (make sure you don’t overdo it with the oil though) and lightly cover with food-wrap. Set the oven to proofing mode (25oC or 80oF) and put the dough in to rise for 4-6 hours or until the dough has roughly doubled in size. If you don’t have proofing mode for your oven, put a large pan of boiling hot water in the oven with the bread to warm the oven up.
For the second rising, divide the dough equally into the desired number of pizza crusts and reshape each piece of dough into a ball again by folding it on itself and rolling it around on the counter like you did in the previous step – this should create a very smooth and tight surface on the dough. Cover and separate the dough balls with food-wrap and place in a container that can be sealed. Cover loosely and let rise at room temperature for 2-3 hours.
At this point, if you are using the dough the same day, continue to let rise at room temperature for 2 more hours before starting to form the pizza crusts. Otherwise, if you are storing the dough for future use, snap the lids of the containers on and put in the fridge for up to 3 days. Alternatively, you can freeze the dough for future use, and this is best done individually (lightly flour before putting dough balls into freezer bags).
If starting with refrigerated dough, take the dough out of the fridge 4 hours before forming the crusts to warm it to room temperature and allow it to continue to rise.
Forming the Crust
Place each dough ball on a lightly floured surface and starting at the middle of the dough, work outwards and press it lightly to shape the dough into a disc while regularly rotating and flipping it over to ensure a round crust. Be careful not to press the edge of the disk so that it leaves a slightly raised edge.
Once you are finished, the centre of the disc should be approximately 2-3 mm thick and the edge should be approximately 1 cm thick. If the dough shrinks elastically or starts to get too thin as you shape it, then simply wait a few minutes before completing the disc to allow the dough to relax. Also, the finished cooked crust will vary significantly depending on how thick the dough is to start, as a starting point, form the uncooked crust to 20 cm so that the edge rises sufficiently during the cook. (Do not use a rolling pin to create the disc!)
Toppings and Dressing
Topping Ingredients
Canned peeled San Marzano tomatoes – we purchase the cans that have whole tomatoes in a tomato puree
Fresh Mozzarella (Buffalo is preferred for its higher fat content, creamier texture and depth of flavour)
or
Fior di latte
Extra Virgin Olive Oil – this has greater resistance to oxidization and better stability at higher temperatures
Fresh basil
Grated hard cheese such as Grana Padano or Parmigiano Reggiano (optional)
Sea salt
Crush the tomatoes by hand until a homogenous consistency is achieved. You may need to remove the tougher parts where the stems attach. Strain some of the juice out to create a slightly thicker consistency (otherwise the sauce will be watery when the pizza is done cooking) and add the sea salt to the sauce at a ratio of 1 g of salt per 100 g of tomato. Do not cook the tomatoes, this is done while the pizza is being cooked.
Put the disk of dough on a floured wooden pizza peel and using a spoon, place the tomato sauce into the center of the pizza base and in a swirling motion spread it over the entire surface of the base except for the raised edge.
Cut the mozzarella into 5 mm thick slices or crescents and pat dry if too wet. Place evenly on the pizza base. If using hard grated cheese add it evenly.
Add the extra virgin olive oil in a spiral motion to the top of the uncooked pizza to help with even cooking of the ingredients.
Top with basil as desired prior to cooking.
Cooking the Pizza
Traditionally Neapolitan pizzas are cooked at about 900oF for approximately 90 s. Unless you have a pizza oven it will be difficult to achieve these temperatures. A barbeque will often heat to hotter temperatures than an oven will and in many cases up to 700oF. We use a Kamado Joe (similar to a Big Green Egg) which can achieve the very high temperatures required and has a ceramic dome to reflect the radiant heat back down on the pizza similar to that of a pizza oven.
If you are not using a pizza oven with a stone base, a pizza stone must be used. Remember to put the stone in the oven or BBQ before turning it on so that the stone heats slowly, otherwise it may crack. Ideally, the dome temperature above the pizza stone should be slightly higher than the temperature of the surface of the pizza stone (you can check the surface temperature using an infrared thermometer). When using the Kamado Joe, we start cooking when the dome temperature is about 750oF and the stone temperature is about 650oF and the pizzas are cooked in about 2m30s – every second makes a difference at these temperatures.
Give the pizza peel a shake with a quick jerking motion to make sure that the dough is loose from the wood peel surface before transferring it to the pizza stone. When done, the crust should be browned and raised on the top with dark brown spots on the bottom and the cheese should be bubbling on top. It is easiest to remove the pizza with a metal peel to transfer it to the cutting surface.
Note that if using a barbeque or grill, there is direct heat below the pizza stone which may cause the temperature of the stone to be much greater than the temperature of the oven above the pizza – this will lead to either burnt crust or under cooked toppings. To solve this, two pizza stones can be used; stack them on top of one another with about 2-3 cm space between them (for this I use four black cast iron pipe fittings sitting on the lower stone and creating ‘legs’ to support the upper stone). This method shields the upper stone from the direct heat coming from below and balances the temperatures of the dome and stone.
Serving the Pizza
When you take the pizza out of the oven, transfer it to a cutting surface and cut into quarters. We like to lightly oil the serving plate (if different from the cutting surface) and sprinkle with flaked salt before putting the finished pizza on top – this gives a slightly salty taste when taking a bite and is a trick we learned from PST Pizza in Tokyo. From there, fold your quarter in half to give it support and enjoy!
- Category: Bread and Buns, Make-ahead, Freezes Well