Description
Oh my goodness this pie. Not to be confused with Chocolate Mousse Pie from Fine Cooking, this was borrowed from Smitten Kitchen from her book, ‘the smitten kitchen cookbook’, and is so rich I could truly only manage a (large) single bite. It was chosen by the girls for their ‘Birthday Pie Party’ along with Sautéed Apple Pie, Strawberry Rhubarb Pie, and Lemon Tarts – my Mom also surprised them with a Saskatoon Pie! And this Chocolate Silk Pie was still the one that everyone went the most wild over. I made mine larger by 25% because I assumed the whole crowd coming over would want to try it, so I’ve put those measurements in brackets next to the original recipe. The filling still fits in the Pyrex pie plates I always use, it was just mounded slightly and therefore an itty bitty sliver was still a healthy portion/taste. My only other suggestion is to make this pie the day before so that it can be refrigerated and set overnight – enjoy!
Ingredients
Chocolate Silk Pie
Chocolate Crust
2 c. chocolate wafer crumbs (I used Oreo)
1 T. sugar AND a pinch of salt
6 T. butter, melted
Preheat the oven to 350 and in a medium bowl whisk together the crumbs, sugar and salt. Add in the melted butter and stir well to combine, then press all evenly into your favorite pie plate, making sure to use the side of a measuring cup to press the crust evenly up the sides of the plate as well. Bake for 10 minutes, then take it out and carefully press the whole crust again (using the same measuring cup). Allow the crust to cool completely before adding the filling.
Super Rich Filling
12 T. butter, room temperature (or 16 T. for the larger pie)
1 c. sugar (or 1 1/3 c. for the larger pie)
3 oz. unsweetened chocolate, melted and cooled (or 4 oz. for the larger pie)
3 eggs (or 4 eggs for the larger pie)
1 t. vanilla
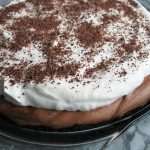
Garnish – 1 c. whipping cream beaten with 1 T. sugar AND chocolate curls or shavings
Instructions
Using your electric mixer, whip together the butter and sugar for a few minutes until the mix is pale and fluffy. With the mixer on low, drizzle in the cooled chocolate and scrape down the sides as needed. Add the eggs one at a time, and then beat at medium speed after each addition for a full 5 minutes – scrape down the bowl before adding in the next egg. When all eggs have been added (and the 5 minutes after each addition is complete), add in the vanilla and blend again to finish it up.
Spread the chocolate filling into your prepared crust and smooth out the top. Carefully cover with plastic wrap (it’s okay if the wrap touched the pie in the middle as the blemish will be hidden by the whipped cream), and then allow the pie to set in the fridge for at least 6 hours, but preferably overnight.
Notes
Before serving, whip the cream, spread it on the pie in any design you wish and garnish with the chocolate – I recommend starting with slim slices…but no one will be able to stay away!
- Category: Make-ahead, Pie