Description
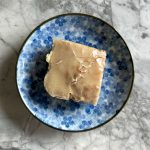
To say these were a hit is a massive understatement – and it turns out they’re even better the next day! I had this printed off from Grandbaby Cakes ages ago and finally had an opportunity (and a crowd) to try them out on. Rich, delicious, easy!, toffee/brown butter/caramel/maple flavor…even the consistency is divine – enjoy!
Ingredients
1/2 c. (113 g) butter, browned, and then scraped into your electric mixer to cool to room temperature
1 1/3 c. (267 g) brown sugar AND 1/2 c. maple syrup
1 T. vanilla AND 2 eggs, room temperature
2 c. (250 g) flour
1/2 t. salt AND 1/4 t. baking soda
Glaze
1/4 c. (57 g) butter AND 1/2 c. maple syrup AND a pinch of salt
1 c. (120 g) icing sugar – sifted!
Instructions
Brown your butter first so that it has time to cool while you get everything else ready. Preheat the oven to 350, butter a 9 x 13 pan, line it with parchment so that it has handles to help you remove the squares when they’ve cooled and butter the parchment.
To your mixer bowl (where the brown butter is), add the brown sugar, maple syrup, vanilla and eggs and beat on medium speed until well combined. Reduce the speed to low and add in the flour, salt and baking soda and mix until combined. The batter will look and feel like really thick cake batter.
Scrape it all into your prepared pan, use a spatula to make sure it gets into all of the corners and bake for about 20 minutes until the middle is just set and the internal temperature reads 200.
Make the glaze while the blondies are baking. Add the butter, maple syrup and salt to the same pot you browned the butter in and heat it on low while stirring until the butter has melted and the mix has come together. Remove the pot from the heat, carefully add in the icing sugar and whisk until the glaze is beautifully smooth and there are no lumps.
When the blondies have come out of the oven, place the pan on a rack and evenly pour the glaze over all – I used a spatula to quickly and continually move the glaze from the middle to all of the edges until the edges were nicely saturated. Leave all of this alone for a couple of hours until the glaze has set.
I think it’s easiest to use the parchment to remove the blondies to a cutting board before slicing, but refrigerating them would also work. They need to be cool in order to get perfect squares. If there are any left over, cover them up and refrigerate, I don’t think the glaze would survive the freezer (these won’t last long anyway!).