
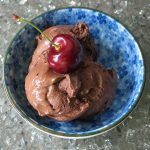
Heavenly Chocolate Ice Cream
Description
This is the ‘treat’ that I will forever ask for for my birthday…over anything else! It is truly the most divine chocolate ice cream you will ever enjoy…and the price (besides the calories), is that it’s basically a half day affair. Brock and the girls have tackled this a couple of times now…it’s SOOO worth it, but you do need to plan ahead (and it helps immensely if you have a handy kitchen assistant (me!), cleaning up after you, as you use every bowl and measuring device in the pantry). Borrowed from Bon Appétit, this just might be our favorite dessert of all time, but please, read the recipe carefully a couple of times before you begin – enjoy!
Ingredients
Heavenly Chocolate Ice Cream
7 oz. good dark chocolate (70% to 75%), chopped
2 c. + 2 T. whole milk
1/3 c. cocoa
6 egg yolks
13 T. sugar, divided
1/4 c. whipping cream
Instructions
Put the chocolate in a glass bowl and carefully melt it in the microwave (or in a bowl over a pot of boiling water). Microwave on high in 30 second increments, stirring in between, until the chocolate is melted but not hot. Set this aside.
In a heavy medium pot, whisk the milk and cocoa over medium heat until the mixture begins to boil, then set this aside too.
Using your hand electric mixer and a medium bowl, beat the egg yolks with 7 tablespoons of the sugar until the mix is very thick – about 2 minutes. Now, whisking constantly, gradually add the hot milk mix to the egg yolk mix (this is where a third hand comes in handy). Return this new mixture back to the milk and cocoa pot, add in the melted chocolate and whisk to combine. Stir this over low heat until slightly thickened and an instant-read thermometer reads 175 degrees…this will take at least 5 minutes.
Transfer what is now chocolate custard from the pot to a large bowl, place that large bowl inside another large bowl filled with ice water and stir until the chocolate custard is cool.
Bring the remaining 6 tablespoons of sugar and 2 tablespoons of water to boil in a small, heavy and deep pot over medium-high heat, stirring carefully until the sugar is completely dissolved. Boil, occasionally swirling the pot and brushing down the sides with a wet pastry brush (I have a silicone one) – do not stir! – keep this up until a dark amber color forms, this will take about 5 minutes. Next, gradually whisk in the cream (the mix will bubble and splatter). You’ve now made caramel too! Whisk the caramel into the chocolate custard.
Here’s where the recipe says to strain the final mix before placing it in a large covered container to chill for 2 days. You can decide whether or not it needs straining, we’ve never done this…but the mix does need to chill! (We’ve also only chilled it overnight and the ice cream has worked out just fine).
Process the chocolate custard/caramel mix in your ice cream machine according to the manufacturer’s instructions (for us, this literally just means turn the machine on, though the bowl will have had to have been in the freezer for a couple of days). Transfer the soft ice cream to a container to freeze for a day or 2 before serving – shockingly, we have eaten it straight away before…but then always say that we should have left the ice cream to freeze overnight. Really frozen allows you to enjoy the ice cream for longer!
- Category: Make-ahead, Sweets, Ice Cream